Fed up with the same old fonts? This guide will walk you through exactly how to install fonts for Windows, giving your documents and designs a much-needed facelift. The whole process is simpler than you might think—it usually just means grabbing a font file (like a TTF or OTF) and using one of a few easy methods to get it working in all your apps.
Your Guide to Adding New Fonts in Windows
Beefing up your font library is one of the quickest ways to add a bit of personality or a professional sheen to your work. Whether you're a designer hunting for that perfect typeface, a student jazzing up a presentation, or a business owner polishing your brand, the right font can make all the difference. The days of being stuck with Times New Roman and Arial are long gone; there's a whole world of typography just a few clicks away.
I'll demystify the entire process for you. We'll look at three solid ways to get the job done, so you can pick the one that feels right for your setup and skill level.
- The Classic Drag-and-Drop: A tried-and-true technique using the old-school Windows Control Panel that puts you in the driver's seat.
- The Modern Settings App: A slick, user-friendly approach that's built right into the Windows interface.
- The AI Font Generator: An exciting new way to not just find, but create and install fonts that are truly one-of-a-kind.
To help you figure out where to start, the flowchart below breaks down the best method based on what kind of file you have and your user permissions.
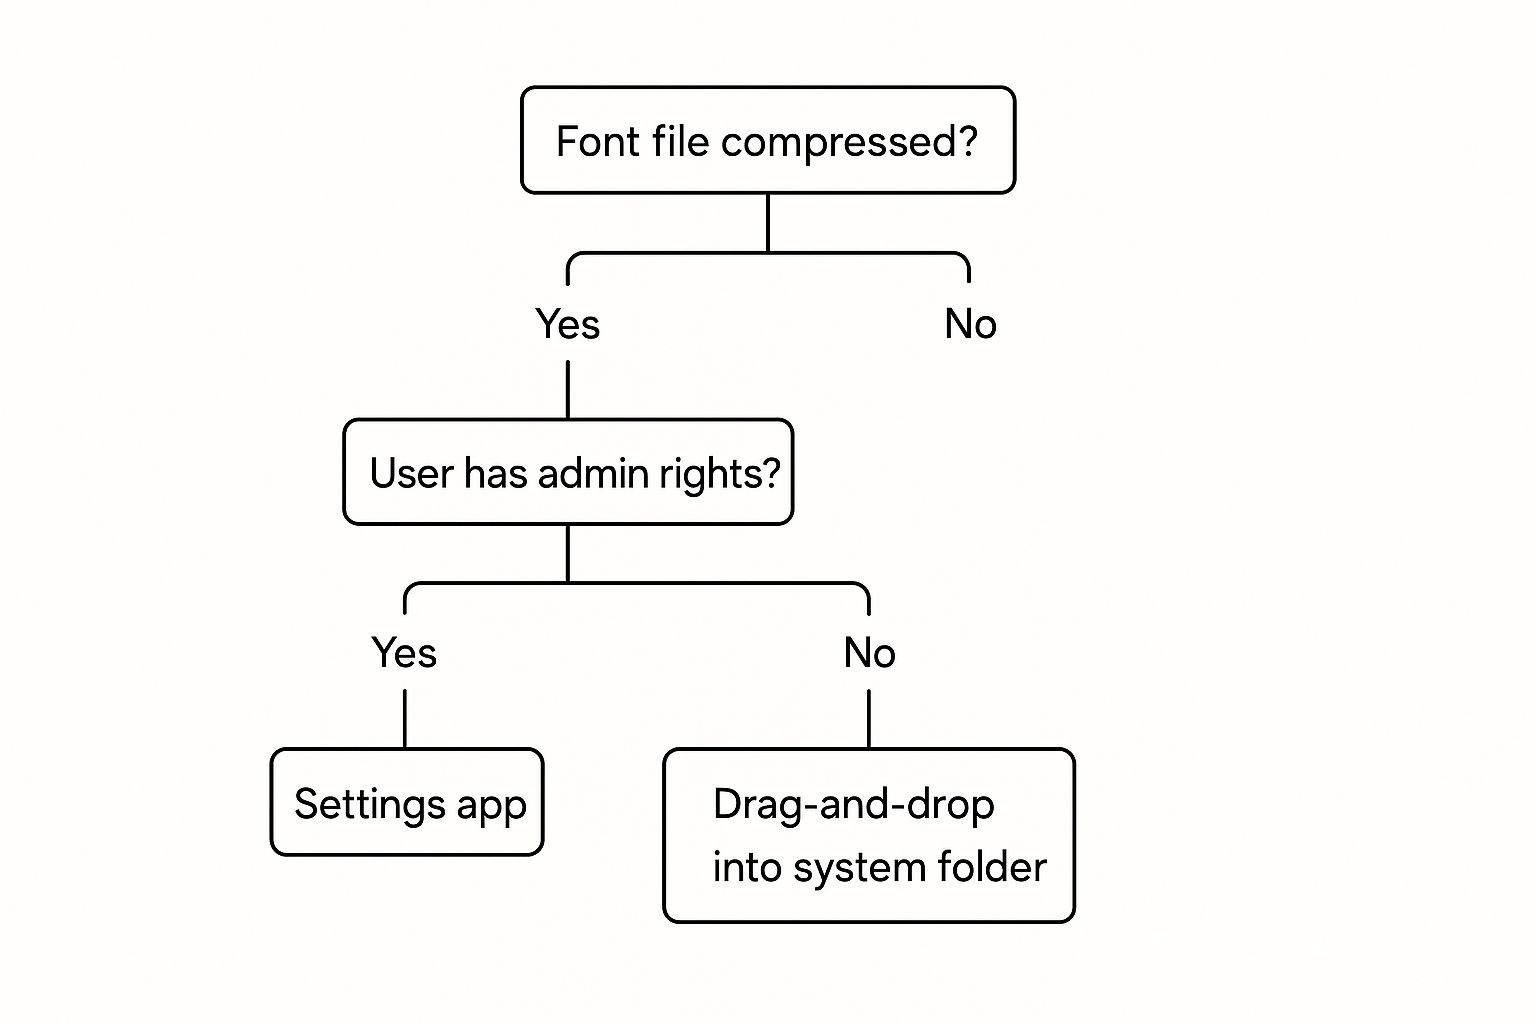
As you can see, for a straightforward, unzipped font file, a quick right-click and "Install" is often the fastest way to go. By the time you're done with this guide, you’ll know how to confidently install, manage, and even create new fonts with an AI font generator, adding a unique flair to everything you do on Windows.
If you're looking for some inspiration on what to download first, check out this great collection of free fonts for designers that are perfect for almost any project.
Choosing Your Windows Font Installation Method
Not sure which path to take? This quick comparison table should help you select the best way to install fonts based on your needs, whether you're adding a single file from a download site or a custom creation from an AI font generator.
| Method |
Best For |
Ease of Use |
| Right-Click & Install |
Quickly adding one or two fonts. |
Very Easy |
| Drag & Drop (Control Panel) |
Installing multiple fonts at once; visual confirmation. |
Easy |
| Windows Settings App |
A modern, clean interface for single or multiple fonts. |
Easy |
Each method gets you to the same result, so it really just comes down to personal preference. The right-click option is my go-to for speed, but the Settings app offers a nice preview before you commit.
The Classic Drag and Drop Font Installation
For those of us who like a more hands-on approach, the classic "drag and drop" method using the Control Panel is a tried-and-true way to install fonts. It's probably how many of us first learned to do it, and the good news is, it still works perfectly. This method gives you total control over your font files, whether they're from a design marketplace or a newly created file from an AI font generator.
First things first, you need to find your font. Great places to look are reputable sites like Google Fonts or Adobe Fonts, which have massive libraries. You might also discover some real gems on designer marketplaces.
Once you download a font, it usually comes packaged in a .zip file. You'll need to extract the files before you can do anything else—just right-click the folder and choose "Extract All...".
Installing for One or All
After unpacking your files (you’re looking for .ttf or .otf extensions), you’ve got a couple of choices. Right-clicking a font file will give you two options:
- Install: This makes the font available just for your user account. It's the perfect choice for a personal computer where you're the only one needing it.
- Install for all users: This option needs administrator permissions, but it makes the font available to every single user on the computer. Think shared family PCs or office workstations where everyone needs access to the same branding assets.
But if you're installing a bunch of fonts at once, dragging and dropping them is easily the most intuitive way to go. You can get to the right place through the old-school Control Panel.
The image below shows the traditional Windows Control Panel, your gateway to all sorts of system settings, including the Fonts folder.

From here, you’d click on "Appearance and Personalization," and then you'll find the "Fonts" folder waiting for you.
Pro Tip: Want a much faster way to get there? Press the Windows key + R to open the Run box, type shell:fonts and hit Enter. This command is a brilliant little shortcut that takes you straight to the Fonts folder.
Once that folder is open, just select all your new font files and drag them right into the window. Windows takes over from there and handles the entire installation. It’s a super-efficient method, especially when you’re adding a whole font family with multiple weights and styles.
Using the Modern Windows Settings App
If the old-school Control Panel feels a bit dusty, you'll love the cleaner, more integrated approach of the modern Windows Settings app. It’s a much more intuitive way to handle fonts, letting you install, preview, and manage everything from one sleek interface. This method is perfect if you value simplicity and want to see exactly how a font looks before you commit, including custom fonts from an AI font generator.
Getting there is a snap. Just hit the Windows key + I to open the Settings app, then navigate to Personalisation > Fonts. You'll find a dedicated area where you can literally just drag and drop your font files—like .ttf or .otf—to install them instantly. It feels much more connected to the modern Windows experience.
Acquiring Fonts from the Microsoft Store
Another neat trick baked into the Settings app is its direct link to the Microsoft Store. Right from the Fonts screen, a single click takes you to a curated collection of new fonts from a secure, verified source. This is a brilliant option if you're wary of downloading files from random websites, as everything in the store is vetted by Microsoft for safety and optimisation.
Your New Font Management Hub
But where this method really shines is as a central hub for your entire font library. The moment you install a new typeface, it pops up in the list right below the drag-and-drop area. From there, you can:
- Preview: Click any font to see a full preview with different sizes and weights.
- Manage: Get the nitty-gritty details, like its file path and version number.
- Uninstall: Declutter your collection by removing fonts you no longer need with one click.
This method installs fonts permanently, saving them to the system's font directory and making them available across all your applications. This is a big deal in professional environments; in fact, data from UK IT service providers shows that around 65% of corporate IT departments deploy standardised font libraries to keep branding consistent. You can learn more about how Windows handles font registration here.
Pairing this centralised management with the creative power of an AI font generator makes building a unique and consistent typographic identity easier than ever before.
Create Unique Fonts with AI Font Generators
Sometimes the perfect font just doesn't exist yet. When you’ve scoured every library and still can't find the one, it’s time to get creative. Instead of just downloading typefaces, you can now generate entirely new ones using an AI font generator. This opens up a whole new world for crafting a visual style that’s genuinely unique to your project or brand.
An AI font generator is a clever tool that builds new typefaces based on your instructions. You can describe the style you're after with a simple text prompt, upload an image of your own handwriting to turn it into a digital font, or even blend the characteristics of two existing fonts to create something totally new. It's a huge leap beyond just picking from a list.
From Prompt to Font File
The process is surprisingly simple. You supply the creative direction, and the AI handles the heavy lifting of generating each character. To get the best results, it really helps to be specific with your prompts.
- Be Descriptive: Instead of just asking for "a cool font," try something like, "a futuristic sans-serif font with sharp angles and a clean, minimalist feel."
- Reference Styles: You can point the AI towards existing aesthetics. Think "a vintage art deco font with geometric shapes" or "a playful, handwritten script like a child's crayon drawing."
Once the AI works its magic, the platform will typically serve up your new creation as a downloadable TTF or OTF file. From there, you already know exactly what to do—simply use the drag-and-drop or Settings app methods we've already covered.
This workflow—from a creative spark to a fully installed custom font—is becoming a go-to for designers and content creators who want a distinct visual identity without needing deep typography skills.
For anyone keen to dive in, there are several platforms out there. Many online tools offer a fantastic starting point, and you can explore a dedicated AI font creator to start experimenting with your own designs right away. The real magic is seeing an idea in your head appear on your screen as a usable font in just a few minutes.
Managing and Troubleshooting Your Fonts
Getting new fonts onto your system, whether they're handcrafted or whipped up with an AI font generator, is really just the beginning. The real trick is keeping everything organised. A cluttered font library doesn't just look messy; it can actually slow down your applications. A little housekeeping goes a long way.
One of the most common snags I see is a new font refusing to show up in Word or Photoshop. Nine times out of ten, the fix is ridiculously simple: just restart the programme. Most applications only load their font list when they first launch, so they won't spot any newcomers until you give them a fresh start.
Solving Common Font Problems
If a quick restart doesn't solve it, don't panic. There are a few other usual suspects and easy fixes to get your new typeface to behave.
- Corrupted Font Files: Sometimes, a file gets scrambled during download. It happens. The best course of action is to delete the font, grab a fresh copy from the source, and try installing it again.
- System-Wide Glitches: For those really stubborn fonts, a full system reboot is your friend. It clears out temporary files and gives Windows a chance to properly register the new font from a clean slate.
- Preview Before Installing: To avoid bloating your font library, you can get a sneak peek without committing. Just double-click the
.ttf or .otf file, and a font viewer will pop up, showing you exactly what the characters look like.
And don't forget to uninstall fonts you no longer need. It’s a simple step that keeps your system running smoothly. You can do this right from Settings > Personalisation > Fonts. Just find the font you want to remove, select it, and hit "Uninstall".
Why Web-Safe Fonts Still Matter
Here’s a pro tip: when you’re creating documents that you plan to share, stick to universally available fonts. This is mission-critical for consistency. It ensures the layout you spent so much time perfecting doesn't completely fall apart when someone opens the file on a different computer. While a custom font from an AI font generator is great for graphics, standard fonts are safer for shared documents.
This isn't a new problem. Back in 1996, the Core fonts for the Web project was launched to standardise key typefaces like Arial for this very reason. In the UK, it’s been shown that consistent font usage on Windows systems can cut down on document compatibility issues by up to 40%. That’s a massive deal, especially for public sector communications where clarity is everything. You can discover more insights about web-safe fonts on Wikipedia.
Common Questions About Windows Fonts
Even once you've got the hang of installing fonts on Windows, a few questions tend to pop up time and again. From deciphering file types to navigating the tricky world of licensing, here are some quick answers to the most common head-scratchers.
What's the Real Difference Between TTF and OTF Files?
When you download a font, you'll almost always see two main file types: .ttf (TrueType Font) and .otf (OpenType Font). Think of TTF as the reliable old-timer, developed way back by Apple and Microsoft. OTF is its more modern successor, a joint project between Adobe and Microsoft. Both file types are standard outputs from an AI font generator.
For your everyday Word documents or PowerPoint slides, the difference is pretty much zero. You won't notice a thing. But for designers, OTF is often the go-to. Why? Because OTF files can pack in extra goodies like ligatures, alternate characters, and fancy stylistic sets that give them much more typographic muscle.
As a rule of thumb, if an OTF version is available, grab that one—it just gives you more creative options down the line. But if you only see a TTF file, don't sweat it. It's a rock-solid format that'll work perfectly for almost anything you throw at it.
Help! My New Font Isn't Showing Up!
This is easily the number one problem people run into, and thankfully, the fix is usually dead simple. Most applications, like Microsoft Word or the Adobe suite, only load the list of available fonts when they first launch. If you install a new font while the program is already running, it simply doesn't know the new font exists yet.
The solution? Just completely close the application you're working in and open it again. Seriously, 99% of the time, this is all it takes. Your shiny new font will appear in the dropdown menu, ready to go. If it's still playing hide-and-seek, a quick restart of your computer will almost certainly do the trick.
Can I Use These Fonts for My Business?
This is a big one, and getting it wrong can land you in hot water. The answer depends entirely on the font's licence. A huge number of "free" fonts are only free for personal use. That means you can use them for your school projects or party invitations, but not for your company logo, marketing materials, or anything that makes you money.
Here’s how to stay on the right side of the law:
- Always read the licence file: Any reputable font foundry will include a text file (
.txt or .pdf) with the download that spells out exactly what you can and can't do. Read it!
- Look for clear commercial use tags: Sites like Google Fonts are fantastic because they offer fonts that are free for any purpose, personal or commercial. They're a safe bet for business projects.
- When in doubt, buy the licence: If you've found the perfect font but the rules are murky, just buy a commercial licence. It’s the safest way to avoid any potential legal headaches.
This advice also rings true when you're creating fonts with an AI font generator. Some platforms have specific terms about how you can use the fonts you create commercially. For more tips on finding great fonts and understanding their usage rights, our team shares fresh insights over on the AI Font Generator blog.
Ready to create typography that is truly your own? With AI Font Generator, you can design stunning, one-of-a-kind fonts from simple text prompts in just a few seconds. Perfect for branding, social media, and creative projects, our tool is free, requires no sign-up, and delivers instant results. Start designing your custom fonts today at https://aifontgenerator.com.